How To Use Fpc In Fl Studio 12
Jun 09, 2018 But for those, who want the FL Manual as a PDF File can get it finally now for free, to learn to take the best out FL-Studio or i´ve you use a different DAW and want to purchase and knowing an Image-Line-Plugin for the use as VSTi or VST Effect in your favourite DAW for the good quality and reputation of IL-Plugins, in form of industry.
Here are some things I’ve picked up in FL Studio over countless hours of music production. Everyone’s workflow is different but you’re likely to find something useful here.
In the example – “Synth Lead C” doesn’t belong among the drum layers! Sort instruments and samples in the step sequencer and mixer. Hold the alt key in combination with the up and down arrow keys when in the step sequencer to move inserts. Hold the Alt key in combination with the left and right keys when in the mixer to move mixer tracks.
When your song projects start getting bigger and better it helps to keep everything organised. In a song you might have lead sounds, bass sounds, drum samples, sound effect samples and automation clips all thrown in. It helps to keep every layer named so you can remember what is what or it’ll quickly become a project that you open and instantly want to discard and move onto the next song (only to repeat in a vicious circle). If you spend time organising a project file you’ll end up being more invested in following through with the track. That’s a good thing! I organise them into groups e.g. lead, bass, drums, sound effects, automation.
Yodot Hard Drive Recovery Software 3.0.0.114 Crack Retrieve all of your precious data fast and efficiently with the help of this lightweight and straightforward software application. Download Yodot Hard Drive Recovery Software + Crack Keygen. Yodot hard drive recovery serial. Yodot Hard Drive Recovery Software 3.0.0.114 + Crack/Serial April 8 2019 Retrieve all of your precious data fast and efficiently with the help of this lightweight and straightforward software application. Yodot Hard Drive Data Recovery software is the best hard drive data recovery service, as it performs deep scan of the hard disk to recover lost data after formatting, reformatting, and corruption of the disks. Here is the step by step process to retrieve hard drive data without much efforts. Yodot Zip Repair serial 1.0 Yodot Zip Repair serial yodot zip yodot hard drive recovery yodot recovery software 3.0 activation key Yodot Zip Repair. User can get back data from external SATA hard drive with the use of efficient hard disk recovery utility. External SATA hard drive data recovery tool: Yodot Hard Drive Recovery is the most precise application for user to recover data from external SATA hard drive on all latest versions of Windows system.
It’s one of those things which will slow you down at the start and speed you up in the long run. Get used to using your keyboards function keys in FL Studio to improve your workflow. Here are the shortcuts you should master early on to switch back and forth between windows fast:
| F5 | Toggle Playlist |
| F6 | Toggle Step Sequencer |
| F7 | Toggle Piano roll |
| F8 | Show/hide Sample Browser |
| F9 | Show/hide Mixer |
In addition to these here are two more shortcuts which are good to know. First; Use the “alt” key when manipulating notes in the Piano Roll. This bypasses the snapping grid you have set and you can also use it to stretch or shorten the end of a note. Second; When you are drawing notes in the Piano Roll the note size will be equal to the previous note drawn or selected. Sometimes this is not desirable. In that case hold shift and draw a note and it’ll automatically be snapped back to the grid ready to be resized as you need it.
This frustrating interface problem can be caused when you undock one of the detachable interface panels (click and drag). This can be quickly fixed by pushing CTRL+SHIFT+H – which reverts everything in FL Studio back to the default view.
In FL Studio, “Click and hold & Special Gesture functions” is enabled by default. It means for instance in Piano Roll if you click and hold a note for a short period of time, you’ll be drawing a slide note instead. If you click and hold the right mouse button in the Playlist, it’ll switch to the Slice tool. Whether you change this setting or not is down to personal preference. If you aren’t a fan of these gesture based functions it’s handy to know you can disable them as so from within FL Studio:
Options > General Settings > uncheck “Click & Hold & special gesture functions”
If you’re frequently using the same effects, synths and samples, set up templates for when you load FL Studio. That way, all of your favorite settings will be loaded from the beginning.
You can set these up by saving any project in:
***FL Studio Folder***DataProjectsTemplates
In the image
1 – Step sequencer. I like to use Sylenth1, Massive & FM8 so every project I begin will have these ready. Set this up for yourself and your preferred synths.
2 – Sidechain Channel set up in the mixer – the Fruity Limiter effect added and a kick drum side-chained to this track. By default I have my kick drum linked to mixer track 1. Sylenth, Massive and FM8 are linked to track 2. You can add any number of effects here. You can have a signature synth lead sound with all your reverb/compression/delay/distortion effects added and pre-loaded. Really useful.
3 – VST Plugins – configured to whichever state you need. Their settings will be retained for when you load FL Studio. I have them set to their default initialisation state. New song, new sounds.
Useful FL Studio function to know. Select any pattern or sample in the playlist and then press “select all similar clips”. It’ll highlight every instance of that pattern, or sample, or automation clip etc across the entire playlist. Good for when you want to quickly edit a drum sequence without affecting other parts of the song. e.g. use “select all similar clips” and if necessary use the “make unique” function which creates a new pattern right there – so you can edit on without affecting the original.
Some plugins can cause FL Studio to Crash. One in particular is NI Massive – crashing FL studio whenever it loaded. It was possible to resolve this by deleting the database file located in:
X:Users***your name***AppDataLocalNative InstrumentsMassive
File – NIMassiveDataBase_ul
Moral of the Story – if FL Studio is crashing each time you load up a project or load a certain VST it’s possibly defective. A quick reinstall or removing a file will usually resolve such issues.
Important. It’s possible backups won’t be active by default in FL Studio.
In FL Studio – Options > file settings > Backup autosave > select
This will generate a new (hidden) folder in your FL Studio directory. Backup files are stored inside the “Data” folder.
X:***Program Files***Image-Line***FL Studio Folder***DataBackup
Your backups will be saved here per the preferences you set within FL Studio. If you don’t take the time to sort this out now, you’ll end up setting it up after you lose a project.
When working with automation clips in FL Studio, you can right click any knob or parameter and select “copy value” – and then paste the value into your automation clip for precise automation.
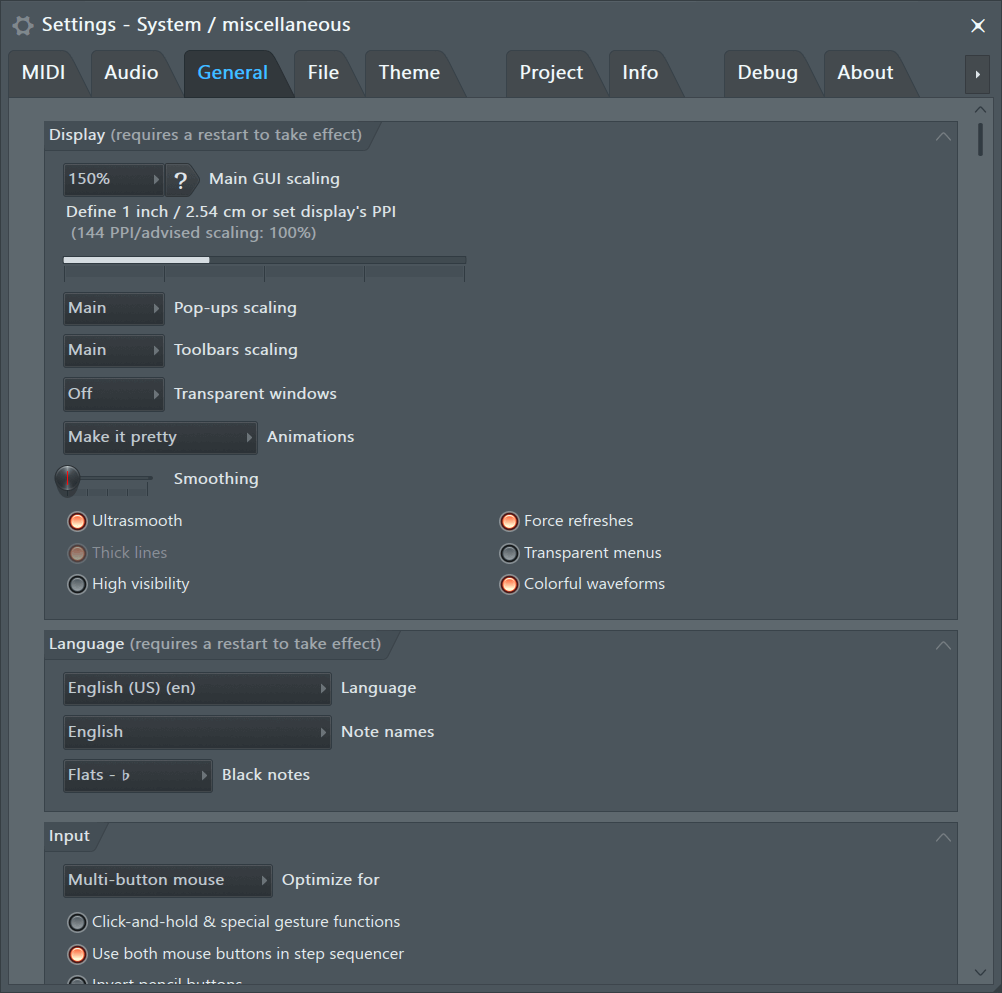
Add a background to FL Studio. I use a black background with a subtle texture. The background I use is below – feel free to download. The more straight forward the background is, the more you can focus your mind and get creative.
Also, in FL Studio general options under animations try “entertain me!” and check the “ultrasmooth” setting for scrolling. It is also worth trying different skins, different view options in the piano roll/step sequencer and different font sizes in the browser. Play with these settings. I don’t use many of the default values.
- Use the reverse clip option on any sample to get interesting effects. Especially good for big cymbal crashes and impact sounds – reverse those for awesome power-up / build up effects.
- Record portions of your song and then reverse them, stretch them and change the pitch to create unique sound effects.
- Make a repeating arpeggiating sequence in the Piano Roll, like ascending triplets and then select the notes. Hold the “alt” key and drag back to make the entire sequence 2x/4x/8x faster. Copy/paste to fill the rest of the measure with those super-fast notes. Surprisingly good way to make amazing sounds.
Some quick tips to make sequences sound less artificial.
- Panning and volume for drums. However you make your drums mix up the panning and volume to make it sound a bit more natural. It’s easy to do in the step sequencer, piano roll, or a drum VST like FPC. “alt+r” will open the randomiser in FL Studio which you can use to quickly add a subtle bit of variation to each note.
- Remove some drum hits from your sequence and add some “mistakes” to your melodies. For instance if you have a long sequence of ascending patterns delete a few notes, or move them completely off pitch. If you have a rolling sequence of hi-hat notes, delete some completely.
- Use the “Alt” key when manipulating notes in the Piano Roll. This will allow you to stretch or shorten the length of any note which is useful to simulate how a human will play an instrument. For instance when you play guitar, you do not completely let go of the previous note when playing the next.
Recently a user emailed to ask if it's possible to add our loops to FL Studio's FPC drum machine. Answer? Yes you can! Here's a short tutorial describing how to add MIDI loops to the FPC browser. The I offer a couple of tips to start using them as patterns.
Find your FPC MIDI patterns folder
FPC ships with a bunch of MIDI patterns stored in a folder named 'FPC drumloops'. It's easy to find the folder holding these patterns. Here's how:
1. Open FPC and look for the pattern browser window on the top right side. It's directly below the Pan, Volume and Pitch controls.
2. Click on the folder icon labeled 'Midi Loop' and it will open the folder location.
In the image below, the red arrow points to the 'midi folder' location.
On my PC it's located at: E:ProgramsFL Studio 20DataPatchesScoresFPC drumloops
Copy the MIDI files into the FPC drumloops folder
First, you may want to create a top-level folder to hold all your patterns. Or a folder for your patterns plus a separate folder for any 3rd party MIDI you have. This is totally up to you but should help you navigate through your loops faster.
For example, create a 'Groove Monkee' folder inside your FPC drumloops folder.

Then copy your loops into the appropriate location. That's it! The next time you start FPC, the loops will be there!
It's easy to use the loops to build a track. Each time you select a loop in the FPC browser, it's added to the current pattern and to the piano roll. You can now edit it in the piano roll, if necessary.
Go to the next pattern in the pattern in the pattern selector. You can rename the patterns to match the file name or whatever works for you.
When you open the arrangement window, all of the patterns you've added will appear on the left side. You can now select a pattern and 'paint' it into the timeline to build a track. Easy!
Tip: If you select another MIDI pattern in FPC before selecting another pattern slot, you'll replace the slot's current MIDI file. So when you find a pattern you like, remember to advance to the next empty slot by pressing F4.
It takes a little getting used to if you've never worked with patterns before but you get the hang of it quickly. And if you need fresh grooves for your tracks, check out our huge collection of professionally played MIDI grooves and bass lines.
You can download free MIDI patterns here.
If you have any questions please give us a shout. Enjoy!